Email notifications are widely used in Oracle Applications for FYI or
Action notifications. They can be achieved in many ways using Workflow,
PL/SQL, host file etc. As we are all getting geared up for Fusion
Middleware, I wanted to explore the option of using BPEL process.
For setting up the environment, refer to the SOA Suite Installation article. The problems I've faced during installation are:
The above two problems were resolved after 4 hrs OWC session with Oracle Support. You can continue with the later part of the article, if your environment is set up. BPEL Process using Email Activity Notification services in BPEL are exposed as web services. The notification service sends email using SMTP and receives email from IMAP-based or POP-based email accounts. You can use Email activity in the component palette to add email notification of BPEL process. You can directly enter the required and optional email addresses and message content (subject and body) or you can use the following built-in functions:
For my example, I will directly enter the recipient email address, subject and body in email activity fields. Before using email activity, you must set up configuration details for email accounts in the ns_emails.xml file, found at <SOAHOME>\bpel\system\services\config Configuring Email Accounts in ns_emails.xml: ns_emails.xml is found in <SOAHOME>\bpel\system\services\config folder. 1. Make a backup copy of the ns_emails.xml file. 2. Open ns_emails.xml in Text Editor and Change the NotificationMode from "NONE". NotificationMode can be set to the following:
I will be using only email, so I have set NotificationMode to "EMAIL". 3. Configure Default EmailAccount. When Email activity is selected in BPEL process, From Account field is defaulted with "Default". If "Default" email account is not configured in ns_emails.xml, email notification is not sent to the recipient. Also this account is used when no account is specified to receive an email notification. This account is also used to send task-related notifications. A default email account must always be specified in the configuration file i.e ns_emails.xml Change FromAddress, OutgoingServerSettings, IncomingServerSettings elements to your desired email address and your smtp host name as below. 4. This step is Optional. Define the parameters for the additional email account with an additional <EmailAccount> </EmailAccount> structure. For Example: If I defined 'Apps2Fusion' email account, I can use 'Apps2Fusion' in From Account field in Email activity. <EmailAccount> <Name>Apps2Fusion</Name> <GeneralSettings> ... </GeneralSettings> <OutgoingServerSettings> ... </OutgoingServerSettings> <IncomingServerSettings> ... </IncomingServerSettings> </EmailAccount> 5. Save ns_emails.xml Configuring wf_config.xml: wf_config.xml is found in <SOAHOME>\bpel\system\services\config folder. It is a workflow configuration file. Add the below property to wf_config.xml <property name="oracle.bpel.services.notification.publisher_interval" value="1" /> This property specifies the interval for sending notifications. If this property is absent, the notifications are sent every 15 mins (default) or after starting the SOA Suite. Once the cofiguration files i.e ns_emails.xml and wf_config.xml are edited, Start your SOA Suite and JDeveloper. If you have already started SOA Suite before editing these configuration files, restart the SOA Suite. Creating Email Activity in BPEL Process Open SOA Launch Console and Click on Application Server Control link. Login with username/password and go to Runtime Ports link at the bottom. Write down the RMI port number. We will use this port for creating Application Server connection in JDeveloper. RMI Port 12401 is fetched from above screenshot. Now I will create Asynchronous BPEL project. My BPEL process looks like in below screenshot. Configure the fields in Email activity. From Account is defaulted with 'Default' email account name. Default email account settings are taken from ns_emails.xml You can also use XPath Builder to set the fields dynamically from input variables. Now Login to BPEL Control and Click on the process name in the dashboard. Click on Post XML Message to manually kick off the process. But the message text came as an attachment. So I went back to my email activity and unchecked Multipart message attachments. I've deployed and ran the process again. Bravo !!! I got the email notification as I wanted. You can view the flow and the xml data at each activity. Click on Instances in BPEL Console, then Flow tab. To revise the whole process to send email notifications, I'm briefing the steps below:
In this article, I've manually initiated the process to send notification. I will automate this step to schedule the bpel process in the next article. |
Showing posts with label SOA Suite. Show all posts
Showing posts with label SOA Suite. Show all posts
Friday, May 11, 2012
Schedule Email Notification using Oracle BPEL - Part 1
########
Labels: BPEL, Email, SOA Suite, SOA Suite 11g
Oracle SOA 11g step by step Installation Guide
I came across some problems while installing oracle SOA 11g 10.3.3
version so i thought to write step by step guide for others and here it
is. My Next Article will be running SOA managed server and deploying
and testing BPEL processes in worklist.
Checking your database Having your database up and running is the most important pre-requisite for installing SOA Suite.
If needed, configure Oracle XE Universal. When you are using Oracle XE, you must update database parameters if you have never done this for your database installation. You only have to do this once after installing. Set the processes parameter to >=200 using the following instructions. SQL> CONNECT user/password SQL> show parameter session SQL> show parameter processes SQL> alter system reset sessions scope=spfile sid=’*'; SQL> alter system set processes=200 scope=spfile; SQL>alter system set processes=600 scope=spfile; SQL>alter system set open_cursors=600 scope=both; SQL> shutdown immediate SQL> startup SQL> show parameter session SQL> show parameter processes The shutdown command can take a few minutes and sometimes the shutdown/startup command fails. In that case, simply restart the XE service in the Control Panel | Administrative Tools | Services dialog after setting up your parameters. Checking your browser Oracle SOA Suite 11gR1 has specific browser version requirements. Enterprise Manager requires Firefox 3 or IE 7.
Installing Admin Server and Managed ServersNow that you have verified that everything is ready, you can begin installation.Installing WebLogic ServerFirst, you install Oracle WebLogic Server.To install WebLogic Server, open a command window and enter: cd c:SOA wls1033_win32.exeWhen the Welcome screen for the install wizard comes up, click on Next. Select Create a new Middleware Home and enter: C:OracleMiddlewarehome_11gR1. This document assumes that path. If you use a different middleware home then adjust accordingly when C:OracleMiddlewarehome_11gR1 is referenced throughout this document.  Click on Next. Enter email address to register for security alerts or deselect the checkbox and decline—whichever you prefer—and click on Next. Select Typical, and click on Next. Review installation directories.  Click on Next. Select “All Users” Start Menu folder and click on Next. Review Summary. 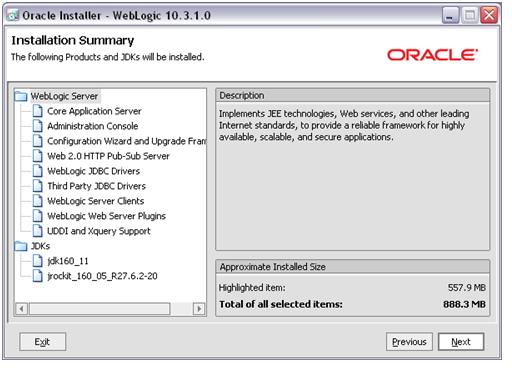 Click on Next to start the installation process. Installation takes about three minutes. When the installation is complete, deselect the Run Quickstart checkbox and click on Done. Dropping the existing schemaIf this is the first time you are installing, you do not need to go through this step and you should jump ahead to the Configuring schema step. Otherwise, if you are reinstalling, continue with these steps to drop your existing schema first. If you would like to keep your existing schema, jump ahead to the Configuring schema step and use a new schema prefix when prompted.To drop your existing schema, copy the following into a command window: cd c:\SOA\rcuHome\bin rcu.batThe bat command returns to the prompt immediately and after a few seconds, the Repository Creation Utility opens. On the Welcome screen, click on Next. Select Drop. 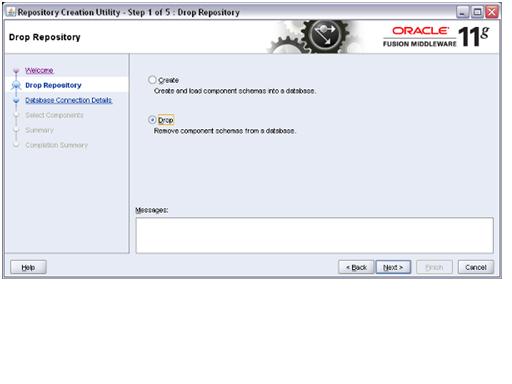 Click on Next. Complete the database information. 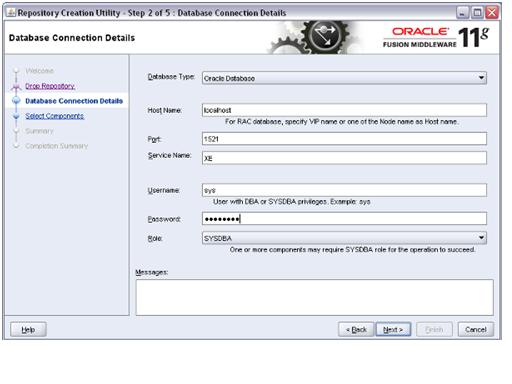 Click on Next. The pre-requisites are reviewed. When completed, click on OK. The utility moves to the next page—with a slight delay, just wait for it. The utility finds the existing schema and offers the drop-down list of all prefixes. Check that the prefix is correct and review the schema.  In this example, we are dropping the schema with the SH prefix. Click on Next. On the drop schema warning, click on OK. The pre-requisites for this step are reviewed. When completed, click on OK to move to the next page—with a slight delay, just wait for it. 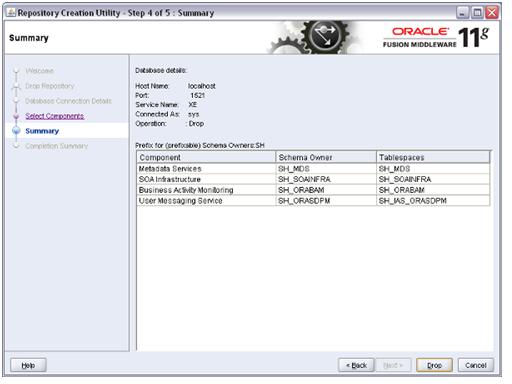 Click on Drop to drop the schema. This takes a few minutes. When it is finished, click on Close. Configuring schemaNow, create the database schema for the BAM and SOA servers.To create the new schema, open a command window and enter the following: cd c:SOArcuHomebin rcu.batThe bat command returns to the prompt immediately and, after a few seconds, the Repository Creation Utility opens (if you just ran the utility to drop the schema, it opens the second time much more quickly). On the Welcome screen, click on Next.  Select Create and click on Next. Enter the database information. 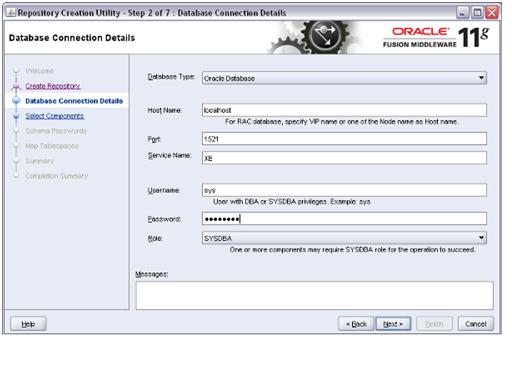 Click on Next. If you are using XE, you will see a warning at this point that this version is too old. You can safely ignore this warning as it applies only to production environments.  The pre-requisites are reviewed. When complete, click on OK. The utility moves to the next page—with a slight delay, just wait for it. On the Select Components screen, enter DEV in the field for creating a new prefix. Select the component SOA Infrastructure. Dependent schemas are selected automatically. If you choose to select other components, these install instructions may not match your install experience. Also, you may have to increase processes in XE (you will get a message telling you what is required).  Click on Next. The pre-requisites for this step are checked. When completed, click on OK. Select the radio button to Use the same password for all schemas. Enter a schema password. The password welcome1 is assumed in this document but you should choose your own secure password or a different one for each schema and be sure to record your passwords as you will need them later.  Click on Next. Review the tablespaces and schema owners for the components. Accepting the defaults, click on Next, and then click on OK to create the tablespaces. When the pre-requisites for this step are completed, click on OK.  Click on Create to create the tablespaces. This takes about two minutes. When completed, click on Close. Installing SOAOnce the database is configured, you can install the SOA server into the Oracle Home on the WebLogic server.In a command window, enter: cd c:\SOA\soa...\Disk1 setup -jreLoc C:\Oracle\Middleware\home_11gR1\jdk160... When the install wizard Welcome screen comes up, click on Next.Wait for the pre-requisite check to complete (it’s quick!). 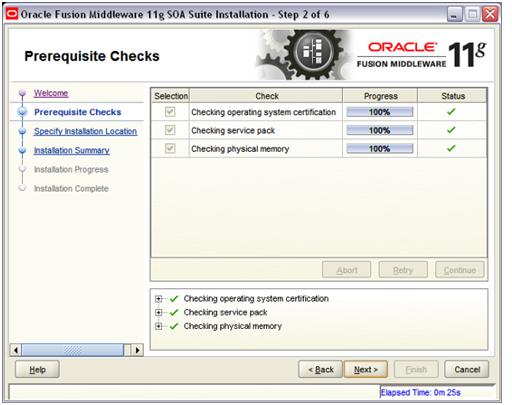 Click on Next. On the Specify Installation Location screen, select the middleware home: C:OracleMiddlewarehome_11gR1. Enter Oracle home: Oracle_SOA1. If you use a different Oracle home, then adjust accordingly when Oracle_SOA1 is referenced throughout this document. 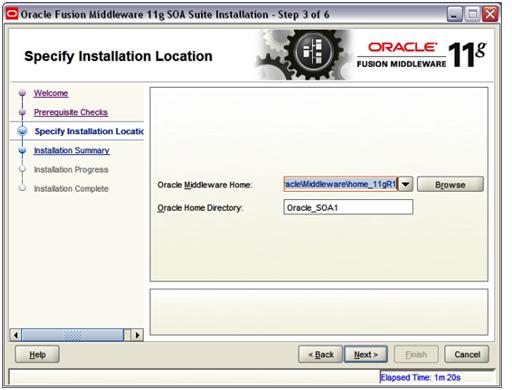 Click on Next. Review Summary. 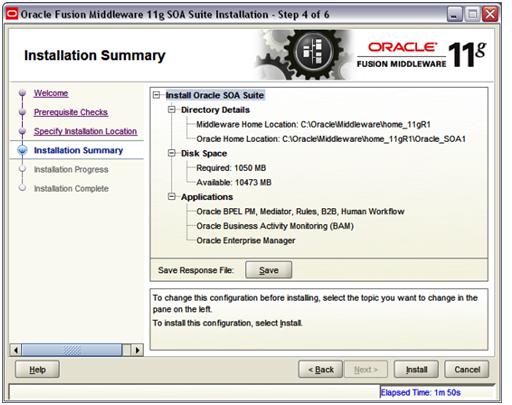 Click on Install. Wait for the installation to complete—it takes a few minutes. Click on Finish. Installing SOA PatchIn a command window, enter:i. cd c:\SOA\soa...\Disk1 setup -jreLoc C:\Oracle\Middleware\home_11gR1\jdk160... ii. When the install wizard Welcome screen comes up, click on Next.On the Specify Installation Location screen, select the middleware home: C:OracleMiddlewarehome_11gR1. Click next and follow the default values till finish. Creating DomainFrom the Oracle Home location, you configure the WebLogic server domain for the SOA and BAM servers.In a command window, enter: cd C:\Oracle\Middleware\home_11gR1\Oracle_SOA1\common\bin config.cmdWhen the configuration wizard’s Welcome screen comes up, select Create a new WebLogic domain, and then click on Next. Select Generate a domain and select SOA Suite, Enterprise Manager, and Business Activity Monitoring. Dependent products are selected automatically.  Click on Next. Enter the domain name: domain1. 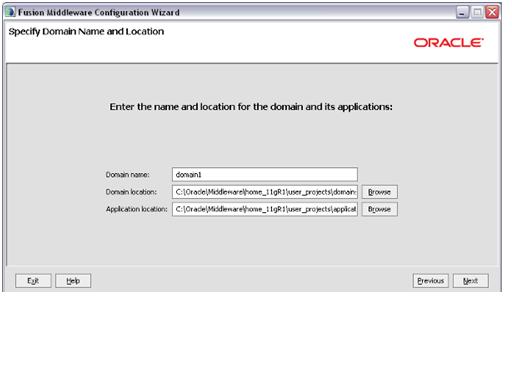 Click on Next. Enter the user name as weblogic and a password. The password welcome1 is assumed in this document but you should choose your own secure password and remember it for later in the document when the password is referenced.  Click on Next. Select the Sun SDK 1.6_11 and leave Development Mode checked. 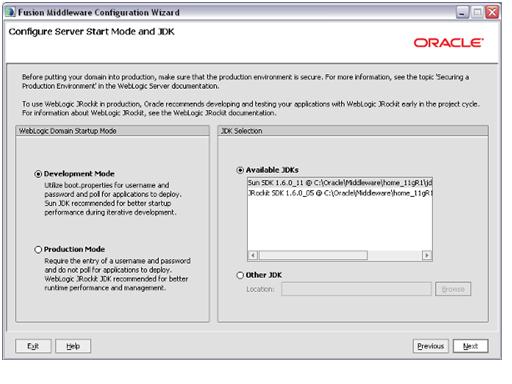 Click on Next. On the Configure JDBC Component Schema screen, you select the components that you want to change, and then enter the property value for those components. First, select all of the components and enter welcome1 for the password in the Schema Password field. With all of the checkboxes selected, enter the Service, Host, and Port values. 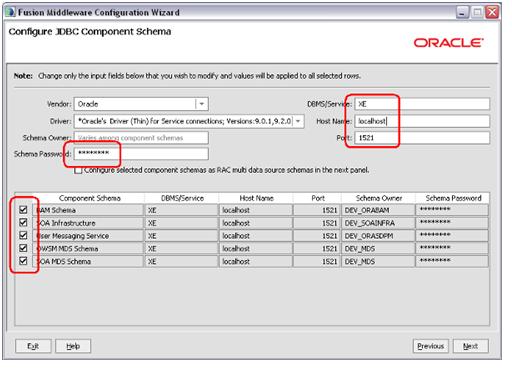 Now, look at the table. Review the Schema Owner column and confirm that the values are the same as what you configured in the Configure Schema section when you ran the RCU. Go back and review the screenshots in that section of this document for the schema owners if you do not remember them. Complete the following if the schema owners need to be updated: Deselect all the component checkboxes. Select BAM Schema only. Enter the Schema Owner for BAM. Next, deselect BAM Schema and select the next one. Enter the schema owners one-by-one. Continue until all schema owners are entered. Click on Next. The data source connections are all tested. 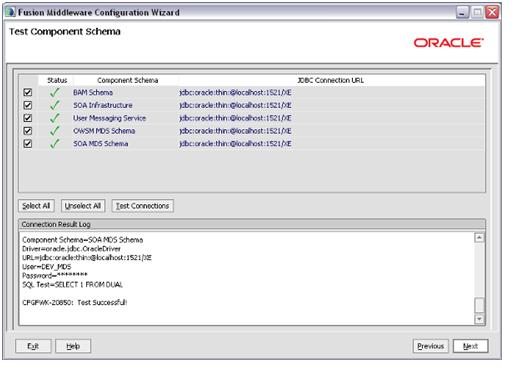 If all are successful, click on Next, otherwise click on Previous and correct any errors. Click on Next once more, accepting defaults (no optional configurations), and you reach the Configuration Summary screen.  Click on Create. Wait for the creation to finish—it takes just a minute. Click on Done. Installing JDeveloper and SOA Composite EditorNow that your servers are installed, let’s install JDeveloper and the JDeveloper extension for SOA Composite Editor.Installing JDeveloperAfter installing the servers, you can install the JDeveloper IDE.cd c:\SOA\ jdev……… Installation Wizards open. Complete the installation wizard as follows. Installing JDeveloper also installs an embedded WebLogic Server that you can use for testing Java applications. You will use this in one of the labs. Welcome Screen—click on Next. Choose Middleware Home Directory: select Create a new Middleware Home and enter C:\Oracle\Middleware\jdev_11gR1. This document assumes that path. If you enter something else, then adjust accordingly when C:\Oracle\Middleware\jdev_11gR1 is referenced. 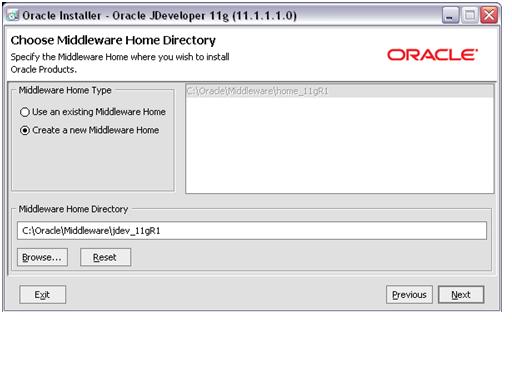 Click on Next. Choose Install Type as Complete, and then click on Next.  Click on Next. Confirm Product Installation Directories. You should see:
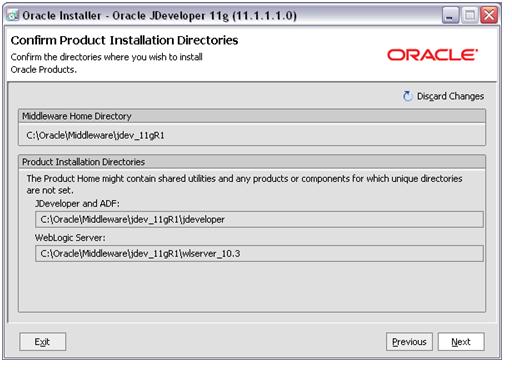 Click on Next. Choose Shortcut location: “All Users”, and then click on Next. Review Installation Summary.  Click on Next and the installation starts. Wait for the installation to complete—a few minutes. When installation completes, deselect Run Quickstart and click on Done. Updating JDeveloper with latest SOASOA design time in JDeveloper requires a JDeveloper extension called SOA Composite Editor. While this is normally updated over the network when using release-level software, you can also perform the update manually if you have the extension file. JDeveloper periodically prompts you to accept an automatic network update. Since this is released software, you have the option to click on OK to update to a newer version. The SOA extension is about 230 MB and may take some time to download.Start JDeveloper Studio 11.1.1.3.0 from the Windows Programs menu: Oracle Fusion Middleware 11.1.1.3.0 or run C:\Oracle\Middleware\jdev_11gR1\jdeveloper\jdeveloper.exe. During startup, select the following when prompted: Select Default Role, deselect Show this dialog every time, and click on OK. Click on No to “Migrate from previous release” If you are prompted to select file extensions to associate with JDeveloper, deselect everything or select the ones you would like for your machine and continue. After starting JDeveloper, wait for the Integrated Weblogic Domain to be created. This domain is created the first time you run JDeveloper after installation. It is not used by SOA. Watch for the completion message for setting up the domain in the JDeveloper Messages log window at the bottom of the JDeveloper IDE: [12:37:11 PM] Creating Integrated Weblogic domain... [12:38:05 PM] Extending Integrated Weblogic domain... [12:38:14 PM] Integrated Weblogic domain processing completed successfully.Now you can update the SOA Composite Editor extension. These instructions show you how to update the extension over the network. Select Help | Check For Updates; click on Next. Select Search Update Centers and select Oracle Fusion Middleware Products. Click on Next. The system will search the update center for extensions. From the list of extensions, select Oracle SOA Composite Editor and click on Next to begin downloading. The extension is about 230 MB and takes a few minutes to download. When the extension has finished downloading, it is listed with the version number detail. |
########
Labels: SOA, SOA Suite, SOA Suite 11g
ESB, BPEL using Oracle SOA Suite: Article
Getting Comfortable with Oracle SOA SuiteGetting Comfortable with Oracle SOA Suite
Before
starting this white paper let me tell you that I am also like you
(readers) who are from the world of Oracle, PLSQL, Oracle E-Business
Suite work areas who is trying to get comfortable with the upcoming
technologies related to Service Oriented Architecture. I am not an
expert in SOA arena. I am going to try to put things in simple terms.
Some of you will differ with my opinion of starting developments related
to ESB/BPEL without fully understanding the concept but I think this
can also be one way of getting to the debth of the subject by actually
developing it.
For
Oracle Apps folks I would suggest, just start thinking about Oracle
Workflow. All things which you can do using workflow can be done using
BPEL and interfaces using (FTP/Shell Script/PLSQL) can be built using
ESB.
I will be using Oracle SOA Suite 10.3.1.1 and Oracle JDeveloper 10.3.3.3 software for demos/screen shots.
Defining Acronym Jargons in SOA world
When
we enter the world of Service Oriented Architecture we come across
various acronyms viz. XML, SOA, ESB, BPEL, WSDL, XSLT, SOAP, XSD, DTD
etc. Let’s define each of them.
XML
is the eXtensible Markup Language accepted by the industry as ideal
vehicle for sharing structured data among applications and
organizations. XML is becoming universally understood, many applications
provide inputs and outputs in XML. XML makes data self describing. XML
eliminates fixed formats.
XSD (XML Schema Definition), a Recommendation of the World Wide Web Consortium (W3C), specifies how to formally describe the elements in an Extensible Markup Language (XML) document.
DTD is Document Type Definition which is again one of the industry accepted way of defining XML structure.
WSDL
(Web Service Definition Language) is an XML format for describing
network services as a set of endpoints operating on messages containing
either document-oriented or procedure-oriented information. The
operations and messages are described abstractly, and then bound to a
concrete network protocol and message format to define an endpoint.
Related concrete endpoints are combined into abstract endpoints
(services).
SOAP (Simple Object Access Protocol) a message-based protocol based on XML for accessing services on the Web.
SOA
A service-oriented architecture is essentially a collection of
services. These services communicate with each other. The communication
can involve either simple data passing or it could involve two or more
services coordinating some activity. Some means of connecting services
to each other is needed.
ESB
is an open standards-based distributed synchronous or asynchronous
messaging middleware that provides secure interoperability between
enterprise applications via XML, Web services interfaces and
standardized rules-based routing of documents.
BPEL
(Business Process Execution Language) for Web services is an XML-based
language designed to enable task-sharing for a distributed computing
or grid computing environment - even across multiple organizations -
using a combination of Web services.
Installing Oracle SOA Suite
Download
SOA Suite installable soa_windows_x86_101310_disk1.zip from
oracle.com. Unzip the file in C:\OracleSOAInstall and run setup.exe.
During installation you will get two options viz. Basic Install and
Advanced Installation. Generally SOA Suite needs a database for
installation. If Basic installation is selected then it automatically
installs Oracle Database Lite on the machine while Advanced
Installation needs Oracle Database 10G (10.2.0.3 or higher). For
advanced installation, oracle database needs to have following schemas
ORAESB, ORABPEL and ORAWSM.
Basic installation installs following components
· Oracle Containers for J2EE
·
Oracle SOA Suite including Oracle BPEL Process Manager, Oracle
Enterprise Service Bus (ESB), Oracle Web Services Manager (OWSM), and
Oracle Business Rules.
· Oracle Enterprise Manager 10g Application Server Control
· Oracle Process Manager and Notification Server
· OC4J Java Single Sign-On
Advanced installation includes all the above components along with Oracle HTTP Server with SSL Support.
I
would suggest not going for advanced installation if you are
installing Windows XP Professional desktop/laptop because I always
found issues Oracle Web Services Manager and Oracle BPEL manager during
advanced installation. Using Basic installation as well at the Oracle
BPEL Process Manager fails to configure at the end of installation but
without exiting installation screen you can restart SOA Suite using
windows start menu and retry BPEL process manager configuration.
During
installation please make a note of Application Server Instance Name
(e.g. SOA_AS) and administrator username oc4jadmin and password. This
will be needed all the time for login on to Application Server Console,
BPEL Console, ESB Console and WSM Console.
After Basic installation, application server is accessible at URL http://localhost:8888
or http://<machine>:<port> where you will find all the
links to BPEL Process Manager, Web Services Manager Console and ESB
Console.
Application Service Control
Configuring the Container
Once
you install Oracle SOA Suite, you need to create a connection pool,
data source, and database adapter, Oracle Applications Adaptor
Connection Pool and Data Source
Adaptors in SOA Suite
In
SOA world, systems talk to each other through various adaptors. In the
context of an SOA an adapter is an intermediary service that bridges
incompatible data formats between services and its clients. An adapter
often also acts as a façade or technology gateway. Oracle SOA suite is
shipped with various such adaptors given in following screenshot
In this article we will take a look at how to setup DbAdaptor, AppsAdaptor, File Adaptor and FTP Adaptor
Database Adaptor
Oracle Applications Adaptor
File Adaptor
File
adaptors is already setup with default installation and can be used as
it is while developing ESB or BPEL applications. For File Adaptor the
JNDI location is eis/FileAdapter which can be used for writing files at
any location on machine hosting Oracle SOA Suite
FTP Adaptor
FTP Adaptors can be created for each destination machine by setting up configuration properties needed for FTP process.
Conclusion
This
much knowledge of configuring Oracle SOA Suite is sufficient to start
developing applications based on ESB and BPEL. In the next article we
will take an overview of Oracle JDeveloper 10.1.3.0 and various
services, Process Activities involved in developing ESB and BPEL
projects.
|
########
Subscribe to:
Posts (Atom)
